Sunday 30 October 2011

Tricky Dick

I am not a fan of entanglement puzzles but this rather interesting (and inexpensive) one with a strange name caught my eye when I was at the Yallingup Maze in Western Australia. The Tricky Dick was designed by Rick Eason and presented at the 19th IPP in London in 1999. The copy which I bought was made by Mr Puzzle Australia.

The puzzle consists of three wooden pieces (looks like stained radiata wood), namely an octagonal block attached by a rope to a long cylindrical rod. The rope which runs through the centre of the rod is sealed into the rod. A circular disk is attached to the end of the rope. Overall the construction and quality is good. A brass ring encircles the rope and the object of the puzzle is to remove this ring.

This is my first entanglement puzzle and my attempts to remove the ring initially ended with the brass ring and the wooden pieces all tangled up in a twisted mess. I suppose there is a reason why these puzzles are called entanglement puzzles. Now I had two objectives...one, to disentangle the knotted mess and two, to solve the puzzle by removing the ring.
After over an hour or so, I finally managed to untangle the puzzle back to its original unsolved state. This actually gave me the "A-ha" feeling and I was pleased with myself for achieving the disentanglement. However, I didn't want to put myself through another hour of frustration, so I decided to check out the solution that accompanied the puzzle. I found the solution not exactly easy to follow but it was better than none. This is a tough puzzle. I would never have been able to solve the puzzle without the solution. Following each step to the tee, eventually I got the brass ring out!

The Tricky Dick is rated at a difficulty level of 8 out of 10, so I am not surprise that I didn't even come close to solving it. Honestly, even with the solution which shows the sequential steps, I still cannot quite comprehend and figure out how the brass ring is removed from the rope-wood ensemble, given that it looks really physically impossible to do so. Anyway, for entanglement puzzle enthusiasts, here is one challenging puzzle to consider.

Rick Eason has a website which features two variations of the puzzle and hints to solving. Tharn Jaggar's puzzle blog also has nice photos of the step by step solution.

Wednesday 26 October 2011

Four To Square

The Four To Square is a 4-piece 2D packing puzzle designed and made by Jacques Haubrich. This puzzle was entered into the 2011 IPP Competition in Berlin. Made of stainless steel, the puzzle is 73mm square in size. Overall quality and construction is very good and the 4 irregular shaped pieces are of a slightly different colour tone from the tray giving the puzzle a nice contrast. The object is to pack the 4 pieces flat into the tray.
While it might look deceptively simple with just 4 pieces, which is what I had (wrongly) thought initially, the puzzle is actually much harder than it appears. I actually spent quite a bit of time on this puzzle over a number of days, yet I just could not fit in the last piece nicely into the tray. For a while, I even wondered if Jacques had sent me the wrong pieces as he was packing his puzzle off to me or the pieces of my copy were not cut that precisely! Well, thankfully it was neither. Truth be told, after much trying and not getting anywhere with this, I emailed Jacques for a clue. He was kind enough to send me a drawing with one of the pieces in the right position within the tray. Even with his clue, I still took a bit of time to finally get the remaining 3 pieces nicely inside the tray. I was just not thinking out of the tray (or box) and trying to fit the pieces from just one angle!

Overall, a nice little (no pun intended) challenging packing puzzle.

Tuesday 25 October 2011

Aluminium 10 Move Burr

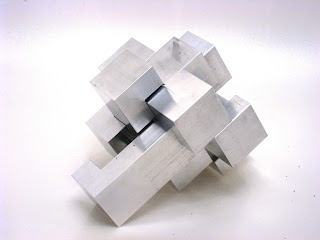
I acquired this handsome 6 piece burr from William Strijbos. While the puzzle was made by Wil, the design of the burr actually came from Peter Marineau and the original name of the burr was "Piston Puzzle". As the name implies, you need to make 10 moves to remove the 1st piece, although the Piston Puzzle is a 9.3 burr (ie 9 moves to remove the 1st piece).


The quality of this burr is excellent. Made of solid aluminium, every one of the 6 pieces of the burr is very well CNC milled and finished to very tight tolerances. All the pieces fit nicely together and are able to slide smoothly against one another. This is not something you should allow a young child to handle; while the edges are sharp, they won't cut. However, the corners are really extremely sharp and if you ever dropped this thing on your bare thigh or foot while puzzling, and one of the corners happens to land on your flesh, a nasty bleeding cut is almost guaranteed! The puzzle itself is about the right size for the hands, measuring about 67mm x 67mm x 67mm.


The 10-move has only one solution - meaning you have to engage the right pieces with moves in the correct sequence in order to solve the burr. I found the disassembly not too difficult; about 15 to 20 minutes of pulling and pushing various movable pieces here and there was all it took for me to take apart the 6 pieces. But when it came to fixing everything back together again, this was where I was stumped! And super-stumped for a long time. On hindsight I should have "recorded" or noted down my disassembly moves but was too lazy and impatient to do so, hence I paid the price. Something I will definitely do next time with the next burr.

For over several days, I tried fitting all manner of configurations and moves with this burr but got no where. I just couldn't put Humpty Dumpty Burr back together again. I don't have much experience with burrs, having only gone through several relatively easy ones, so I found this one extremely tough! Eventually I decided not to frustrate myself any further. As Wil does not accompany his puzzles with solutions, I tried checking on the internet. I had heard about the BurrTools programme from some of the other puzzle bloggers, but after a quick inspection on the BurrTools site, decided it was too complicated for me and so gave it a pass.


The solution I finally found came from the IBM Research Burr Puzzles site where there is a Java applet showing the sequence of steps necessary to disassemble the Piston Puzzle. For those interested, other well known and popular burrs by designers such as Stewart Coffin and Bill Cutler are also featured. All I did was to go in "reverse" and the programme showed me how to reassemble the puzzle step by step.

Following the applet, I was able to put the burr back together again, much to my relief, as I really did not want to put away 6 loose pieces back onto the shelf unsolved. I found this burr too much of a tough cookie for me (maybe I should have gotten Wil's 7-move burr to start off instead) but nonetheless glad that I got it for my collection.

For other comments on the 10-move (and 7-move) burrs, do look at Oli's, Neil's and Allard's puzzle blogs.

Thursday 20 October 2011

Cross

The Cross was designed by William Strijbos in the 1970s and according to Wil, was his first puzzle. Like all of Wil's metal puzzles, the Cross is very well constructed to tight tolerances and of excellent quality. Measuring 60mm x 60mm x 35mm, the puzzle is made of solid aluminium. While not that large, the Cross is feels weighty in the palm.


The puzzle consist of two blocks interlocking with each other to form a "cross". Inserted within each of the blocks is a metal rod which locks the two blocks together. The object of the puzzle is to separate the two blocks by amongst other things, manipulating the two metal rods, which can rotate on its own axis and slide in and out in both directions.

I had the benefit of reading Kevin's review of the Cross prior to getting the puzzle, hence I had a reasonably good idea how the puzzle worked. Despite this, I still took about 45 minutes to figure out how to remove one of the rods which is the first of several steps to the eventual separation of the blocks. If I had not read Kevin's review, I think I would have taken at least a couple more hours.

Once disassembled, I took nearly another 30 minutes to put everything back together; this was just as hard, if not harder than the taking apart. I got stuck a few times before both rods were finally inserted flush into their respective holes and locked the puzzle. No banging or knocking is required here as there are no magnets, however you do need to make good use of gravity to solve the Cross.


After I had taken apart the Cross, I studied the internals carefully to determine the sequence of disassembly and reassembly, even marking a couple of the parts with little coloured stickers to help me remember the orientation of the puzzle and what goes where and which direction. There is a series of moves in the correct order which must be adhered to. I must say the way the puzzle is taken apart and put together is very clever; really amazing for a first puzzle design from Wil or for that matter, anyone else. After several practice runs, I eventually got the hang of it and managed to solve the Cross repeatedly and fairly easily.

This is a nice take-apart type puzzle to own. While not extremely difficult; it poses a substantial challenge for the mind and for the hands. The number of moves required (and in the right sequence) to disassemble and assemble it keeps the puzzle sufficiently engaging for repeated play. There are three other reviews of the Cross you may wish to check out. (see Jeff'sNeil's & Allard's puzzle blogs).

Tuesday 18 October 2011

Cast Spiral

This puzzle was acquired at the Yallingup Maze, Western Australia not by me but by my brother-in-law. Being a first time puzzler, he didn't dare to risk spending a lot of money on a puzzle and hence decided to try out a relatively inexpensive item. The Cast Spiral by Hanayama, in all its shiny metal looked appealing and good value-for-money to him. I was going to buy the Cast Cage so it was also in my interest that he got something different in order that I could try his puzzle as well :-)


The Cast Spiral is made of aluminium and measures about 48mm in diameter with a thickness at the centre of approximately 20mm. It is made up of 5 solid interlocking pieces which can be "stretched" out like a spiral. For its size, the Spiral feels pretty heavy in the palm.

The object of the puzzle is to disengage and take apart the 5 individual pieces. When its fully stretched out, the Spiral's 5 pieces remain locked together, and there appears to be no possible way to unlock them. Both of us took turns at trying to solve the Spiral and for the time we spent at the Maze Cafe, neither of us could solve it.

However our joint efforts came to fruition later in the evening when we were waiting for our food at the take-out restaurant; my brother-in-law managed to take apart the 5 pieces! Not bad for a first-timer! He did admit it was more by chance than anything else that he managed to fiddle it apart. He continued to play with the 5 separate pieces for a while but this time, couldn't get it to lock back together. This is where I managed to redeem myself - I took the puzzle away from him, studied it for a while, tried to determine which piece linked with which and thankfully, after some trying, managed to fit the 5 pieces back to the solved state.


After the puzzle had been solved, we slowly retraced the steps to determine the correct way to disassemble and assemble. Once we figured out what were the moves, it was pretty easy thereafter to take it apart and solve it repeatedly. Overall a fun puzzle that can be easily taken anywhere. Three other bloggers have also written about the Spiral so you may wish to check out Oli's, Kevin's and Brian's puzzle blogs.

Friday 14 October 2011

Just Six

This 6 block burr puzzle was acquired from the Yallingup Maze as in my previous post on The Cube. Again it is made by Mr Puzzle Australia of cedar stained radiata wood. Externally, this puzzle seems to be similar to the Sly Burr on the Mr Puzzle Australia site and the wood there used by the Sly Burr is different. This is where any similarity ends; Allard has commented "the Sly Burr really lives up to its name" (Allard, thanks!). The package description states that this puzzle was sold as the The Small Devil's Hoof in its earlier incarnations. It is a fairly large burr of around  90mm square. The puzzle was actually available in either sharp edged or bevel edged and I chose the latter. Again, overall quality is very good here.

The object of the puzzle is to assemble the 6 blocks (all differently cut) into one interlocking burr. None of the 6 blocks are identical while 1 is a solid piece which locks the puzzle together.

There is obviously a sequential way to assemble the burr but I proceeded with my usual trial and error style. I was actually able to solve this burr within a matter of minutes even though this puzzle has a difficulty rating of 7/10; surprise surprise!! After solving it, I took a look at the solution and true enough, the steps were laid out in a particular order. Personally I think the puzzle is not so complicated that one cannot solve it by trying different interlocking configurations to see which works since its only 6 pieces and the relatively large size of the blocks allows for easy handling. After my earlier struggle with The Cube, this puzzle provided some welcome consolation! Allard has also written about the Just Six so you may want to check out his comments on it.

The Cube

This 3D packing puzzle is designed by Andreas Rover and made/sold by Mr Puzzle Australia. I bought it while on holiday visiting the Yallingup Maze in Western Australia. The Cube was also an IPP27 Gold Coast, Australia exchange puzzle.

The Cube is made of cedar stained radiata wood and has an orange brown colour. It measures 90mm x 90mm x 45mm (with 6 different shaped blocks inside the box frame). Construction, quality of fit and finish of the box and individual blocks are very good. The object of the puzzle (apart from merely taking out the blocks and fitting them all back nicely) is to make use of the loose blocks to form a cube.


The blocks are all of varying shapes and while I expected the task of solving to be not that easy, I did not expect that I would struggle for so long and still not be able to form the cube as required. After nearly several hours of trying, I gave up and decided that there must be something I was not doing right and went for the solution. What I saw stumped me! I totally did not expect the solution as that which came with the puzzle. I looked back at the description of the packaging which reads: "The object of the puzzle is to make a cube with the given pieces. Not your usual 3x3 cube; a very entertaining puzzle"; I then realised that I had overlooked a simple but vital clue in the said description.
The Cube is rated at level 5/10 difficulty level but I would say it is closer to perhaps 6. While not overly difficult (on hindsight), it is certainly had me fooled!

Tuesday 11 October 2011

P&L Packing Puzzle

The P&L was designed by Junichi Yananose and made and sold by Mr Puzzle Australia (aka Brian Young) for exchange at IPP31. It is actually a petite packing puzzle measuring 80mm(L) x 63mm(W) x 23mm(H) and very pocketable. Again the attraction for me to this puzzle was the use of 5 different woods consisting of Queensland Silly Oak, Tasmanian Blackwood, Pepperwood, Rosewood and Queensland Silver Ash. My copy is very well cut and made and all the pieces fit into the box very nicely.
The object of the puzzle is to pack into the box 5 L-shaped pieces and 5 P-shaped pieces. One of the L-shaped pieces has a No.31 (IPP31) on one of its surfaces and this No.31 must show up on top when the puzzle is in the solved state. The 10 pieces form two layers inside the box with no empty spaces. Externally, it looks like the box has got extra thick sides and an unduly small space for the pieces, but this is because the opening of the box leads to a much larger hollow inside the box to which all the pieces must fit in.


The P&L in my opinion poses a reasonably fair challenge. Just when I thought I was about to be able to fit every single piece into the box, I find that I can't fit that one last piece; and out comes all the Ps and Ls again. It took me a couple of hours of trying different layout configurations within the small confines of the box before I finally slotted in the last P on top. Overall, a nice and cute little packing puzzle but those with large hands and fingers may find the small pieces a bit fiddly and clumsy to handle.

Six Pack

This 6 piece interlocking burr puzzle was designed by Jim Gooch and made by Steve Strickland and presented as an exchange puzzle at IPP23 in Chicago in 2003. I was particularly attracted to this puzzle because it is made from 6 different types of exotic hardwoods namely Bubinga, Red Oak, Paduak, Mahogany, Walnut and Pecan. The copy I acquired is apparently from the original batch that was made for the IPP23 exchange.

The puzzle measures a comfortable-for-the-hands 62mm square. Quality of my copy as well as the cut, fit and finish is very good. The 6 pieces move smoothly against each other with no jamming, even after several weeks in the sort of humid weather in Singapore.

While the puzzle is not very difficult, it was also no walk in the park either (for me). It took me a quite a while to study the right moves and try remember the sequential steps needed to put the puzzle back together after taking it apart. What is of help here is the 6 different woods of varying colours which act as visual cues in remembering the correct steps. If the puzzle had been made entirely of just one type of wood, I think it would have been a lot harder.

Overall I think its a nice puzzle which doesn't require a lot of time (nor a lot of moves) to solve...unlike the stories I have read of puzzles that really test the patience which require moves that can run into the hundreds to solve.

Monday 10 October 2011

Tresor

This mini safe box puzzle came from Geduldspiele's site under his Exchange section. Tresor means "treasure" and I guess the name is quite suitable for this puzzle. I had first seen the Tresor reviewed on Jeff's blog and decided it was too unusual to miss owning one. Designed by Clause Fohlmeister and made in Germany of quite sturdy plastic, the safe measures 4 3/4in(H) x 3 1/2in(W) x 2 3/4in(D).


Externally, it looks like the miniature of a typical safe with a red coloured combination dial, a keyhole and a four-spoked turn-wheel contrasted against the white colour of the box. At the back there is a slit, presumably for depositing coins for saving. A plastic colour matching red key also comes with the puzzle. The objective of the puzzle is to open the safe door.

For the first couple of minutes, I was fiddling around with the combination dial and turn-wheel and also twisting the key to see if these could get  the door open. Nothing seemed to work at first. I must admit that when I did finally open the safe door, it was really by pure chance. The locking mechanism of the door is quite clever and I would probably have taken much longer to figure out the solution if not for my stroke of luck.


I thought the Tresor was fun, no matter that I found the solution by chance. Besides being a puzzle, it also serves the very useful function of a piggy bank. Will probably pass it on to my son when he is old enough to learn the importance of saving.

Sunday 9 October 2011

Self-Made Lego Sliding Puzzle

A while back, I chanced upon several YouTube video clips which showed sliding puzzles made out of Lego bricks. One video in particular, by someone named "Mahj" gave pretty good instructions with Flickr photos of how to go about building one. This caught my interest and I thought a Lego puzzle was something interesting (and relatively easy) for me to build on my own.

After some research on the internet, I discovered Bricklink was THE place for getting Lego bricks, whatever the quantity, colour, type or size. Bricklink is a site which consists of an aggregation of over 5,400 Lego brick sellers from all over the world, somewhat similar to Ebay stores. If you can't find what you want on Bricklink, it probably doesn't exist! The seller from which I got all my little bricks and parts from is aptly known as Missing Bricks based in the USA. I selected the required number and type of bricks needed and duly placed my online order. Some of the colours were not available so I had to make do with what I could get. My package of Lego bricks promptly arrived at my home about a week and a half later.

Using Mahj's photos as a step by step guide, I actually managed to constructed a pretty nice looking puzzle for myself (if I may say so). Instead of numbers in the traditional 15 Puzzle, I decided to use alphabets and created a sentence on the sliding tiles. Below is my own homemade Lego sliding puzzle from start to finish.

Photo 1: All the bricks laid out and ready for assembly
Photo 2: Building the base
Photo 3: Adding the structure for the sliding tiles
Photo 4: Completing the structure for the sliding tiles
Photo 5: Adding the smooth surfaced red sliding tiles
Photo 6: Completion of the red sliding tiles leaving one
tile empty. Making sure all the tiles slide smoothly
Photo 7: Alphabet stickers; effective and inexpensive
For those with large hands, use a pair of tweezers
Photo 8: Pasting the alphabets on the red tiles and
putting everything together 
Photo 9: Completed Lego Sliding Puzzle 

Saturday 8 October 2011

Cast Cage

Like the 12 Points To Insanity reviewed earlier, I got this Cast Cage from Yallingup Maze. Made by Hanayama, the puzzle is about  2 1/2in tall and 1 1/2in in diameter. It consists of a black coloured cage made of steel I think, and contained inside is a 6-pointed asymmetrical star made of aluminium. Construction is reasonably good although the fit and finish of the two halves forming the cage could have been better. The object of the puzzle is to remove the star from one of 4 irregularly shaped "cut-outs" around the sides of the cage.

While it looks easy on the outside, it really isn't. The trick is to figure out which of the cut-outs the star can be removed from. I must admit that I solved this puzzle through trial and error; well I suppose then again quite a lot of puzzles of this genre are solved this way anyway. After quite some time trying all the 4 cut-outs, I managed to get the star more than half way out through one of the cut-outs (by chance really) and figured that probably is the correct one. And I was right; with a bit more manipulation, the star practically fell out.


What was more amazing was how easy it was to slip the star back into cage through the cut-out again, literally in a matter of seconds, as compared to the time it took to extract the star! After the star went in, it took me quite a while to get it back out again. The odd shape of the star obviously adds a lot to the difficulty. 

Hanayama rates the puzzle 3 out of 6 in terms of difficulty but I think it deserves a 3.5 maybe. It takes a while to get the hang of gripping one of the points of the star and slowly turning and easing it out of the cut-out. With practice, one can solve it repeatedly and I managed to do it several times quite quickly. There are two other write-ups on the Cage so you may also want to look at Brian's and Jeff's blogs.

12 Points To Insanity

I got this 6 piece interlocking wooden burr puzzle from Yallingup Maze, in Yallinggup, Western Australia while I was on vacation the last couple of weeks. Apart from the main attraction which is a large outdoor maze to amuse children and adults alike, it also has an indoor cafe cum puzzle shop selling a variety of wooden, metal and plastic puzzles (and games) including those from Hanayama, Philos, ThinkFun and of course from Mr Puzzle Australia.

What is really nice about the place is that you can sit and sip a cappuccino for a couple of hours and play with demo puzzles and games that are left around all over the cafe before deciding if you want to purchase any. Anyway, due to the limited time I had and in between watching over my 15 month old son, I played with around 5 or 6 puzzles before settling on buying this 12 Points To Insanity, as well as a Hanayama Cast Cage, an IPP27 exchange puzzle The Cube, a wood, string and ring puzzle called Tricky Dick and a 6 block burr called Just Six; all which I shall review hopefully at a later stage. Now back to the Insanity....

The Insanity measures about 3in x 3in x 3in and from what I think, is made of Australian cedar stained radiata wood which gives the puzzle a sort of orange brown look. Although the Insanity is made by Mr Puzzle Australia, the site doesn't appear to list this puzzle for sale. Construction and cut of the puzzle is very good and the pieces interlock nicely. This is a standard "diagonal burr" (thanks to George Bell for this info). I had a chance to "demo" this puzzle and actually managed to solve it in the cafe with the help of an enlarged photo of the puzzle in the solved state.

The version I went home with was a brand new one shrink wrapped! The puzzle description states the difficulty at level 3. I would agree. Although not difficult to solve, the Insanity does however require a fair bit of dexterity with both hands to get the 6 pieces in order to lock the puzzle together. I took a while to get to grips with the 6 pieces with two hands, three in each and kept dropping some of the pieces onto the table before finally assembling the entire thing back to its locked state. Pressing the pieces against my chest as a support helped a lot too!

While I am no expert or authority on interlocking burrs, overall, I would say the Insanity is a fun puzzle with sufficient challenge (at least for me). It can be solved pretty quickly and repeatedly once you have done it a couple of times and got the hang of it. Jeff has also commented on the Insanity on his blog.